
ROM Review:
I have been using the Galaxy S2 for more than a year and have felt the same restlessness as you would have to get the official Android 4.1.2 update. And when it came, it brought a whole new army of features but at a great price. I felt a remarkable lagginess and battery drain with the stock JB firmware. I was looking for a ROM that could give me all the features of the official Jelly Bean but not the slow performance and poor battery. It was then that I stumbled upon the WanamLite ROM and having installed it on my Galaxy S2, I just fell in love with it.
Wanam, the developer of the ROM, has removed many bloatwares and removed the elements that made it slow. The result is a light ROM that performance faster, has many tweaks, and gives a very good battery life. The ROM is installed via Aroma Installer and it means that you have the control to chose what to install on your phone and what not to. It is a fully Deodexed ROM and therefore you can flash a theme via ClockworkMod recovery too. If you are a lover of the nature themed TouchWiz UX and want to stay with the stock JB features with faster speed and better battery, go with WanamLite!
Here is a preview of the pure Jelly Bean style theme for the WanamLite ROM made by Crussader from XDA. You can download the theme in flashable zip from below.
Downloads:
Download the ROM from below. If you would like to have pure Jelly Bean style theme for the ROM, download the theme file too and install it using CWM Recovery: “install zip from sdcard>choose zip from sdcard” . When the theme is installed, reboot phone and enjoy!
How to Install:
Preparations:
Download the desired custom ROM and the Google Apps (if applicable) zip package from below and copy the files to the external SD Card storage on your Galaxy S2. Do not extract the zip.
Backup your apps, contacts, messages and all other data stored on the internal storage of your phone. These Free Apps will make backing up very easy.
Charge your phone’s battery to at least 60% level.
Turn on USB Debugging on your Galaxy S2 from Settings> Developer Options and check the box.
Installation Steps: Now follow the following steps carefully to install a custom ROM on your phone-
- Copy the ROM and GApps file to your phone’s external SD.
- Turn off your device and boot it into CWM Recovery mode: press and hold the Volume Up + Home keys simultaneously and then press the Power button. Keep the three keys pressed till the Start-up screen with “Samsung Galaxy S II” logo blinks for two times followed by a screen like this:
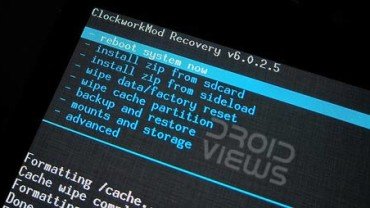
- Use the Volume and Power keys to scroll and select an option/file inside the Recovery mode.
- Important: Do not forget to create a backup of your current ROM, so that you might restore it later in case you do not like the new ROM or stuck on some point during the installation procedure.
- When the backup is complete, go back to the main menu and scroll down to “wipe data/factory reset” and confirm the choice.
- Next, go to “wipe cache partition” and do the wipe.
- Now open “advanced” option and “wipe dalvik cache”
- Having done the 3 wipes as described above, go back to the main menu in recovery and select “install zip from sdcard>choose zip from sdcard” option. Navigate to the ROM file and select it.
- The ROM will be installed now. Wait till the installation is finished.
- If the ROM also requires the Google Apps to be installed, select “install zip from sdcard>choose zip from sdcard” option again and install the GApps package.
- Finally, return back to the main menu and select “reboot system now”.
- Note: Some custom ROMs are installed through Aroma Installer utility. If this be the case, just follow the onscreen instruction and select preferred options.
The ROM will thus be installed on your phone and when it boots up it will have the newly installed ROM. Just go through the initial Set Up and you are on the go. The first boot might take up to 5 minutes before the phone boots up, so be patient. In case your phone is stuck on the bootscreen for more than 6 minutes, pull out phone’s battery and place it back after 1 minute. Boot the device in the recovery mode again and wipe data/factory reset again and then reboot. It should be fixed.


0 comments:
Post a Comment